Shoppers cannot pick up your product, feel it, turn it around and upside down, and otherwise physically understand how it might work for them. Therefore, it’s your product listing’s job to help shoppers understand your product without them physically handling it.
Fortunately, you can more than make up for customers’ inability to physically assess your product by outfitting your listing with excellent product copywriting (“copy” for short).
Today, I’m going to show you how to create an optimized Amazon product listing that drives conversions with superb product listing copy.
Who are we?
Myself and the Just One Dime coaches have over 50 years combined experience selling on Amazon. In that time, we have built 100s of stores and consulted for BMW, Forever 21, a Shark Tank business, and even Amazon themselves.
Keep reading to get our free product listing worksheet that can help you create unique headlines and other important listing copy.

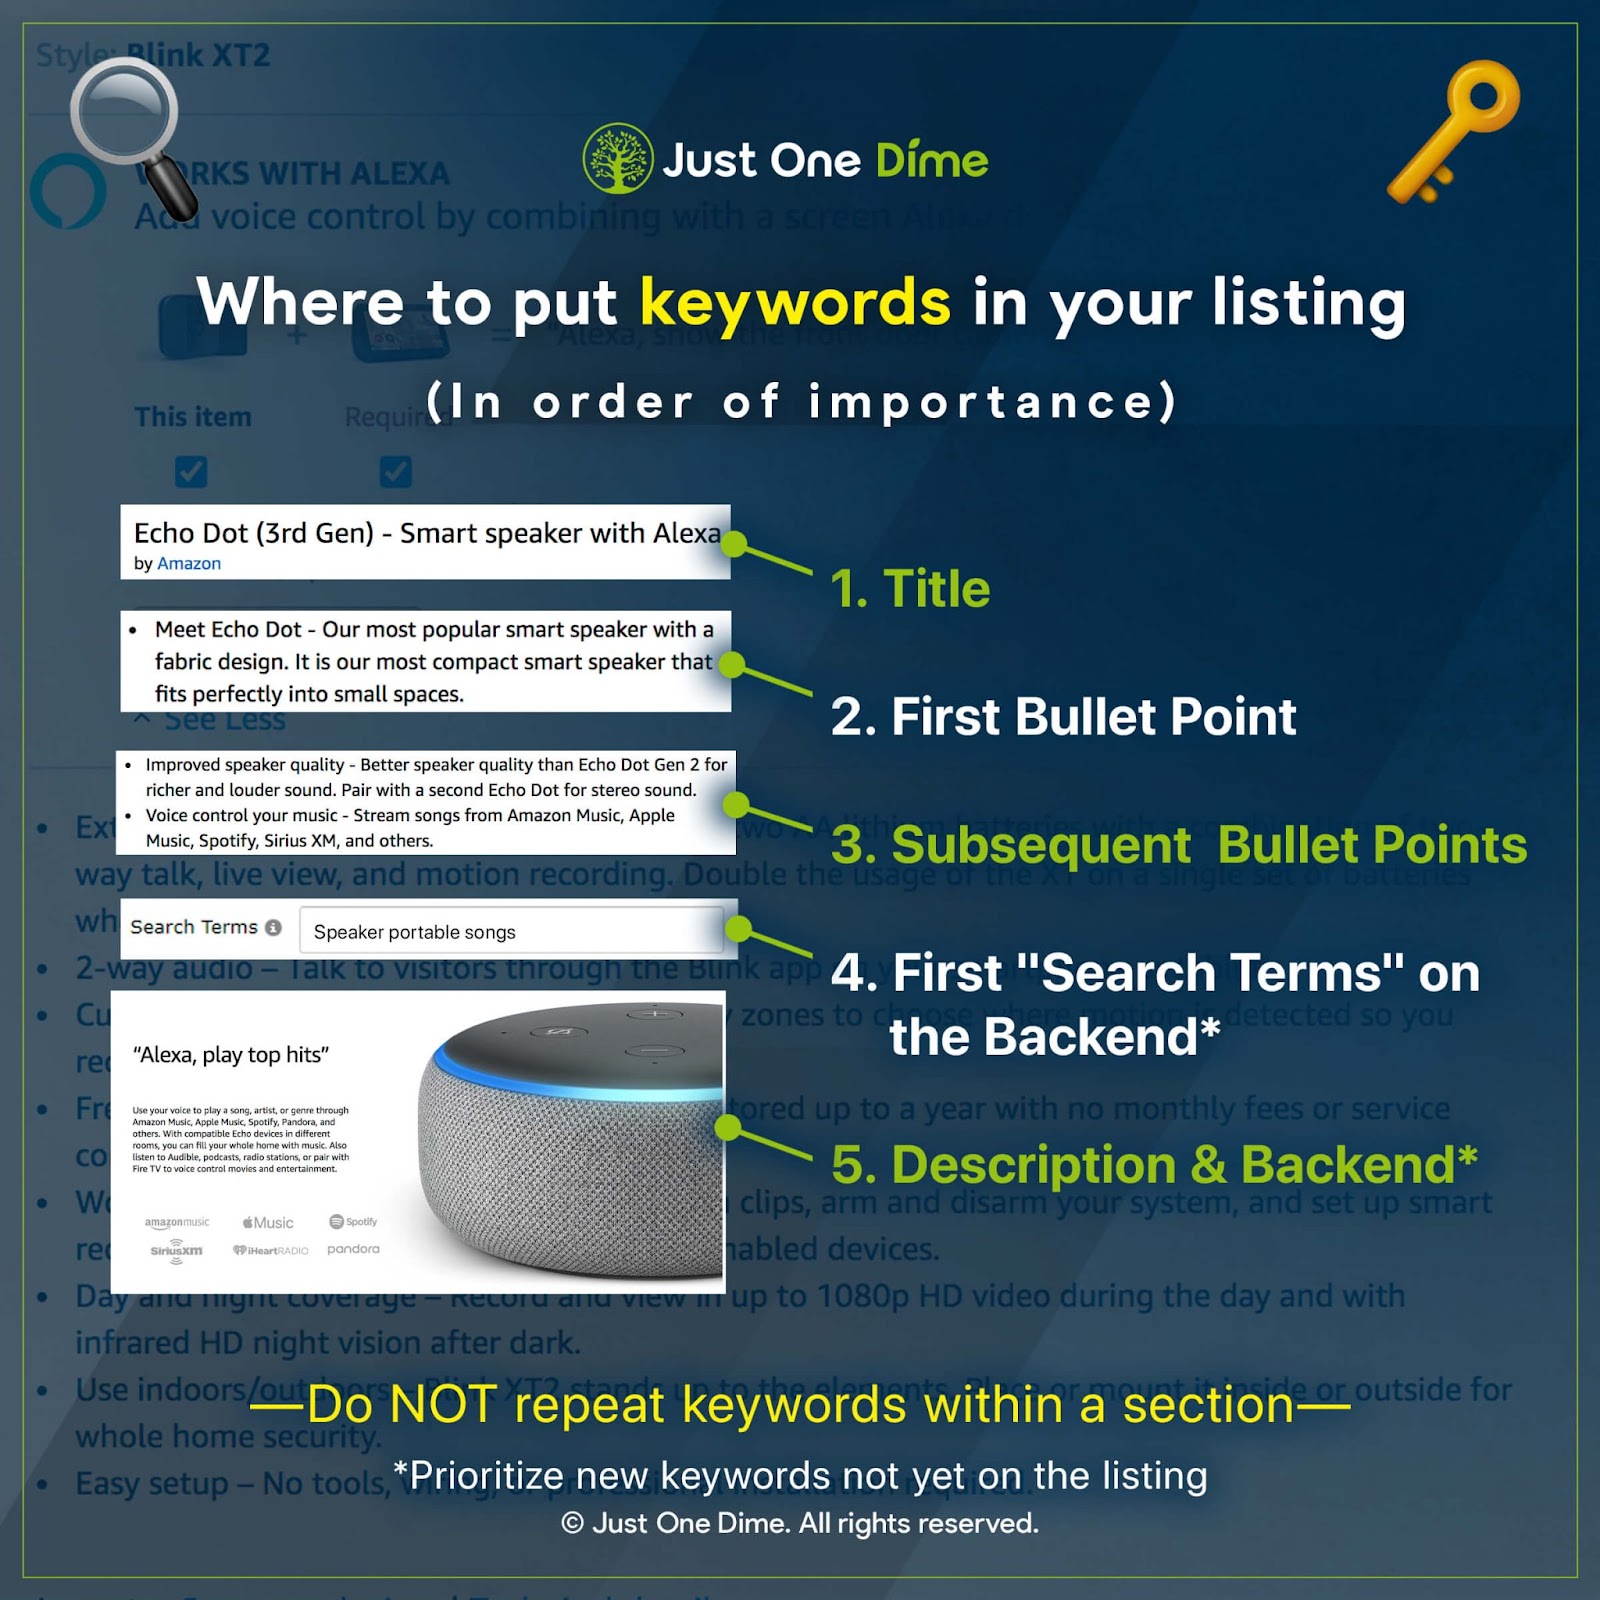
1) Compile Your Keywords.
As we go through the steps to outfit your product listing with optimized copy, we will rely heavily on keywords. Keywords are words or phrases that shoppers type into Amazon.com’s search bar to find what they want to buy.
As you prepare to launch your product, you should conduct extensive research to find the most relevant, most searched for keywords to add to your listing.
There are several ways to easily find relevant keywords for your product listing:
1. Amazon autocomplete
When you search for a product to buy in Amazon.com’s search bar, the bar will automatically give you search ideas based on what you have typed so far. Those search ideas are autocomplete suggestions based on what other Amazon customers have often searched for.
Since a search on Amazon is a search to buy, autocomplete search results offer invaluable insight into Amazon shoppers’ habits.
For example, when we search “kitchen knife”, we get autocomplete suggestions for “kitchen knife set”, “kitchen knife sharpener”, etc.

2. Competitors’ listing titles
As we will cover later on, Amazon product listing titles are chalk-full of keywords, typically, the most relevant keywords to that product. Because of this, your future competitors’ product listing titles are a gold mine of potential keywords for your listing.
For example, in this knife listing title, we can find the keywords:
- Chef knife
- 8 inch kitchen knife
- German high carbon stainless steel sharp knife
- Professional meat knife
- Meat knife with ergonomic handle and gift box

All of these could be relevant if we were to launch our own chef’s knife.
3. Product research softwares
Product research softwares often show you what keywords are most popular amongst Amazon shoppers. They can give you new keyword ideas you might not find with our other two methods.
Product research softwares also offer invaluable insight into individual keywords and their popularity with Amazon shoppers, the top-clicked products after a certain keyword is searched, and so much more.
AMZScout, Jungle Scout, and Helium 10 are all great options.
Just One Dime is launching their very own software, Niche Hunter, later this year. Sign up to be the first to know when Niche Hunter goes live.
Amazon has also created their own Product Opportunity Explorer tool, which offers never-before-seen customer data. The tool comes free with your professional seller central account membership. We show you how to use the product opportunity explorer in this article.
Visit JOD.com/freedom to get an in-depth look at these, and several more, ways to to outfit your Amazon product listing with the best, most-relevant keywords.
However you choose to find them, you should have a collection of keywords ranked most to least relevant before you even begin to think about writing your listing.

When you do write your listing DO NOT repeat keywords. Repeating keywords wastes precious space on your listing. So if one keyword goes in your title, don’t put that same keyword in your description, etc.
2) Write a captivating title.
Your product title is the first thing shoppers will notice about your product after your product photos. It must be strong and detailed.

The base guidelines for your Amazon product listing title are:
- Under 200 characters (individual letters, symbols, or punctuation) including spaces
- No symbols such as “!” or “@”
- No sales jargon such as “25% off”
- No objective commentary such as “#1 best selling”
- Not written in ALL CAPS

Additionally, ensure your listing title:
- Includes highly relevant keywords
- Includes selling points
- Doesn’t repeat keywords
- Doesn’t include unnecessary, filler words (we’ll get to that)
- Is readable

We recommend you take advantage of all 200 allotted characters so you can fill your title with the best keywords to get your product in front of the right shoppers.
Keep in mind, however, that in most cases Amazon will automatically add your brand name to the beginning of your listing title. When you write your title, aim to use 200 characters minus the number of characters in your brand name and one for a space.
For example, if your brand name is “Heliccook”, your brand name is nine characters, ten with a space at the end. 200 - 10 = 190. So you have 190 characters to fill.
But what do you fill those characters with?
If you’ve ever taken a hard look at product titles on Amazon, you might have noticed they’re different from book, movie, and other media titles. That’s because, unlike media, product titles on Amazon are not meant to be grammatically correct. They’re meant to get relevant products in front of shoppers when they search for a product to buy.
Rather than flowing like a sentence, Amazon product titles are chalk-full of keywords—the strongest, most relevant keywords to your listing, to be exact.
For example, let’s say you sell a steel chef’s knife under the brand name “Heliccook”. Right off the bat, “steel chef’s knife” is a highly relevant keyword. It quintessentially describes your product and in a way shoppers might search for it. That keyword should lead your title.
“Steel chef’s knife” keyword, however, only contains 18 characters. Even with our brand name, we only have a 28-character title: Heliccook Steel Chef’s Knife. This is great; It means we can add more keywords.
By searching our main keyword, “steel chef’s knife” on Amazon, we can find dozens of other keyword ideas to fill out the rest of our title from the top search results:
- Super sharp wooden handle kitchen knife

- 8” chef knife

- German high carbon stainless steel knife with ergonomic handle

And, of course, product research software can help you find more high search volume, converting keywords as well.
Aim to use your strongest five keywords to lead your listing title.
Establish your listing in Google Search results.
By adding multiple, highly relevant keywords to your Amazon listing title, you can get your product ranked on search engines like Google through the product listing’s canonical URL.
A canonical URL consists of the first five words in your product’s listing title. These words appear in the listing’s actual URL. By including those five keywords in your URL, shoppers are more likely to find your product through Google search in addition to Amazon search.

Let’s look at this steel kitchen knife:
Its URL includes five words from the listing’s title: “Babish” (the brand name), “German”, “Steel”, “Knife”, and “Stainless”.

When a shopper searches that brand name with those keywords on Google, that Amazon product listing ranks number one in Google search results.

This added Google ranking helps to get the product in front of even more prospective customers.
When you first publish your listing, choose the five most powerful keywords for your title. This forces Amazon to include those five words in your canonical URL. Because you will use this feature to rank on Google, choose highly relevant keywords with high search volume.
Note that you don’t have to include your brand name in your canonical URL. However it can help if you already have decent brand exposure.
Once you first publish your listing, your canonical URL is locked in. You can go back and change your title to include more keywords or change keyword order. However, your canonical URL is fixed once published.
We recommend you first build your title with a strong canonical URL, publish your listing, and then edit your title so as to include more keywords and make the listing more readable to Amazon shoppers.
Employ keyword hinging to rank in more Amazon searches.
When you create both your listing title and your canonical URL, you can rank for multiple keywords at once with one string of keywords. This practice is known as keyword hinging.
Keyword hinging means including multiple keywords in one string keyword phrase.
Keyword hinging is basically keyword-ception: You put small keywords inside longer keywords. In doing so, you can rank for all the keywords you’ve now smushed into one.
Let me show you what I mean with our chef’s knife example. We might write “8” High Carbon Stainless Steel Chef’s Knife”. The phrase explicitly includes:
- “Chef’s Knife”
- “Steel Chef’s Knife”
- “Stainless Steel Chef’s Knife”
- “High Carbon Stainless Steel Chef’s Knife”
- 8” High Carbon Stainless Steel Chef’s Knife
But it also indirectly includes:
- “8” Stainless Steel Chef’s Knife”
- “High Carbon Chef’s Knife”
- “Chef’s Knife 8””
So if we add “8” High Carbon Stainless Steel Chef’s Knife” to our product title, our product will rank for customers who search any of the included, or similar, terms.

Once you’ve expanded your main keyword by keyword hinging, add other keywords—that would inhibit flow in that initial, long keyword—by separating them with “-” dashes.

Eventually, our title might look something like “Heliccook High Carbon German Stainless Steel Kitchen Knife 8” Chef Knife - Ergonomic Wooden Handle - Durable, Extra Sharp, Safe, Light Duty - Perfect Chef’s Gift - Gift Box Included”.
That meets all of our above criteria:
- Is it under 200 characters? Yes, it’s 181 characters including brand name.
- Does it include my strongest keywords? Yes.
- Does it include multiple selling points? Yes.
- Did I avoid repeating keywords? Yes.
- Have I removed unnecessary words? Yes.
- Is it readable? Yes.
When you finalize your title, ask yourself those questions. They should all be “yes”.
Just ensure that whatever features your title advertises are backed up by your product.

We now have a title filled with our most relevant keywords. The next most relevant keywords will go into your listing’s bullet points.

3) Write persuasive bullet points.
Your listing has room for five bullet points, each of which can usually include up to 100 characters including spaces.
Each bullet point should be easily skimmable to help customers process information quickly.

Your bullet points should outline your product’s key features. But…
Lead with benefits, follow-up with features.
Benefits offer value to your customers and acknowledge how your product solves a problem.
Features, on the other hand, are technical aspects of your product. While important, on their own they can be a little dry.
Aim to begin your bullet points with the benefit—the problem solver. Then conclude with the technical aspect of your product that makes that benefit possible (feature).
When you write, add your benefits in ALL CAPS followed by features in sentence casing (capitalize only the first letter of each sentence).
For example, when we build out the bullet points for our “steel chef’s knife”, we might write “CHOP PRECISELY WITHOUT SLIPPING—The ergonomically crafted handle perfectly conforms to adult hands.” In this case, the feature is the ergonomic handle. It offers two solutions to the customer:
- It allows chefs to chop more precisely.
- It helps prevent knife slipping, which can be dangerous.
Both of these benefits add massive consumer value.
Emphasize your product’s value.
Next to your listing’s title, the bullet points are the best place to emphasize the value your product will bring to shoppers.
Take advantage of this space to:
- List your product’s most important, unique features.
- Demonstrate how your product solves problems similar products do not.
- Remove potential customer objections about your product (for example, if shoppers are often concerned that steel knives rust, you might add a bullet point that reads “RUST FREE GUARANTEE”).
- Exhibit how your product is different from and better than the competition.
- List any other value additions your store offers, such as an instructional eBook, a warranty, or any other detail that might help convert customers who visit your listing.
For example, if you offer a two year warranty on your chef’s knife, that’s huge. Maybe competitors’ knife handles break easily. By offering a warranty, you add buyer protection and indirectly state that your product is better than those without warranties.
You might also use your bullet points to advertise a free eBook on how to chop like a professional chef, which you offer to customers in exchange for their email address. This is called a lead magnet.
Both of these examples offer the consumer added value when they buy your product rather than competitors’. You should include this type of information in your second-to-last bullet point.
Make your company stand out.
Save this for the last bullet point.
As we teach in our Amazon FBA membership, it’s so important that you treat your customers like absolute royalty. Your last bullet point is where you show that off.
Let potential customers know that you value them and their experience with your product.
For example, you might write “GUARANTEED PURCHASE - If you are not 100% satisfied, receive a full refund or product replacement.” In doing so, you advertise your amazing customer service—and deep concern for customer satisfaction—right there on your listing.
After your bullet points, your next most relevant and next highest search volume keywords should go in your product description and your backend search terms.

4) Write a keyword-rich product description.
Your product description gives you the most room to brag about your product: 2,000 characters (including spaces). And it’s often your last chance to drive conversions on your listing.
Make sure you include everything—specifically, every relevant keyword—that did not fit into your title bullet points, and backend search terms (we’ll get to those).

Write a description that converts.
Much like your bullet points, your listing’s description should be quickly skimmable. Even though you are given an open box, create headlines that present consumer benefits, followed by the features that make these benefits possible. In fact, include bullet points in your description to make it easy to follow.
Aim to write five, keyword-led description headlines each followed by features that substantiate your product’s benefits and the problems those benefits solve for customers.
For example, we might include a line that reads “Cook like Gordon Ramsay!” to our chef’s knife description.
We would then follow that headline with a product feature that validates this claim: “Stainless, German-engineered steel will have you slicing and dicing like the pros in no time.”
We give you tons of ideas on how to write engaging description headings in our free product listing worksheet, which you can download at JOD.com/listing.
Include nerdier details like dimensions and materials if you haven’t fit those elsewhere.
You can additionally use the description space to tell your brand’s story. Shoppers buy emotionally. In part, this means shoppers buy from brands that resonate with them, their experiences, and their needs. Use any leftover description space to inform shoppers what makes your brand unique and why they should choose your product over others.
For example, on your chef’s knife listing description you might include an emotional anecdote about learning to cook with your grandmother. You could add that she gifted you your first chef’s knife that you still use, etc.
Whatever your brand’s story, make sure it can emotionally resonate with your ideal customer.
You can create a distinguished section for your brand’s story and make your product description stand out by becoming a brand registered seller on Amazon. When you do, you get access to A+ content.
A+ content allows you to build an even richer product description that will make your listing look more like a product page on your own website and less like an Amazon listing. With A+ content, you can add more images and graphics that can make your listing exceptionally more beautiful than your competitors.
For example, in this A+ content, we can see the use of compound images and graphics—including a brand story—that accompanies the listing for a kitchen knife designed by popular YouTuber Babish:

We can show you how to apply to become brand registered and build out excellent A+ content.
If you don’t become brand registered, you will build out your description with HTML by default.
Design a brilliant HTML description.
HTML is essentially the language of software structures. It’s how websites are written and formatted by the tech savvy.
This is where a lot of sellers lose traction. When you add your product description to the backend of Seller Central, you will write your copy in an HTML box. Most sellers will simply write their copy, hit save, and walk away.
Except that HTML means that, unless you include HTML-specific instructions, those descriptions will not keep any of the formatting those sellers have entered.
If you are not among the HTML-gifted, use a converter program such as the Amazon Description Editor, to ensure your formatting doesn’t go to waste.
When you visit the website, enter your listing’s description text into the box.

Then add any formatting necessary such as bolded or italicized text, bullet points, etc.

Notice that the converter does not format text like you would in a Word document. Rather, when you click bold, it adds “<b>” and “</b>” around the bolded text:

That’s the HTML speak.
Amazon has announced that it will no longer support HTML, however we’ve found that HTML still works despite this announcement.
Now that we have a clean, organized listing, it’s time to add the rest of our relevant keywords.

5) Outfit your backend search terms with keywords.
The final step to optimizing your product listing’s copy is backend search terms. Backend search terms are not visible to shoppers. However, backend keywords may still influence Amazon search results and show your product to shoppers.
This section comes with a 249 character limit (including spaces).
In it, input any keywords that are not already in other parts of your listing and that are relevant. You should also include common misspellings of your most relevant keywords to catch any shopper typos.

For example, we might add “steal chef’s knife” to our backend search terms to catch shoppers who mistake “steal”, as in “rob” 🥷, for “steel”, the perfect kitchen knife metal 🔪.
Avoid unnecessary symbols, such as “%” or “&”, and competitors’ brand or product names. Additionally, as with everything we’ve gone through today, do not repeat keywords that already appear somewhere else in your listing.

The order in which you place backend keywords matters, so put your most important backend keyword first.
What I’ve just given you is a thorough overview of how to write excellent, keyword-optimized Amazon product listing copy.
However, there are so many more specifics and nuances to this task that we can’t fit it all into a single article. To learn the full ins and outs of writing a keyword-rich product listing that drives conversions, visit JOD.com/freedom.
Our Amazon FBA membership will teach you how to find a product that will sell, find the right supplier to build it, create a top-notch listing complete with beautiful photos, increase your sales with advertising, grow your business beyond Amazon, and so much more.
Don’t forget to grab your free product listing worksheet below so you can workshop your copy into a sales-driving machine.
What’s your number one writing tip? Let me know in the comments.
